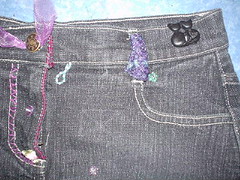
Pages

Tuesday, January 31, 2006

Blackwork in white


Blackwork in white
Originally uploaded by Jam_mam.

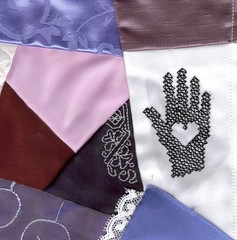
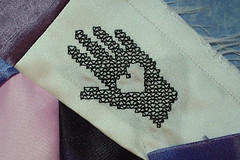
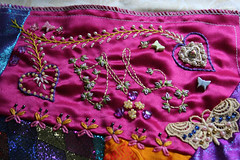
Well, here's some in white. Not so difficult to see on the waste canvas as I feared but I would recommend good light :) Sadly this idea didn't work - it was meant to be a sort of seam treatment but the pattern is too wide, I think, or is it that the seam is too short?

Anyway, the contrast of white on dark fabric works well and I think it is the contrast that does all the work in blackwork - it is possible to use lots of different colours of thread - maybe a varigated thread on a large piece would look good too.

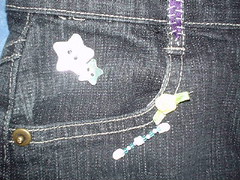
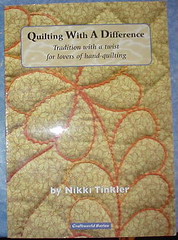
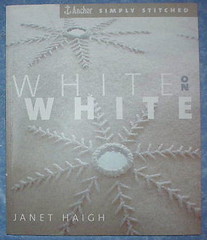
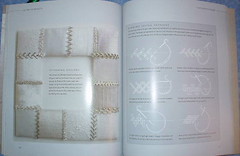
There are possibilities of decorating this with beads and other additional embellishments but I really needed a narrower and perhaps more geometric pattern I think. Maybe I could try working it over the top of the seam, rather than next to it - if i had two dark fabrics adjacent. Anyway lots to think about, and I had the perfect excuse to buy a new book this amazon listing should let you look inside :)

Blackwork hand - finished!


Blackwork hand
Originally uploaded by Jam_mam.

Dampen the waste canvas with tap water, be careful with delicate fabrics as water marks can stain. I used a moistened towel to dab the whole of the waste canvas. (The photo is taken when the background is still wet hence the translucence of the fabric. It is possible to pull the individual threads out without dampening the canvas but this requires more force than I like as I do not want to move any of the blackwork stitches.

Once the waste canvas has absorbed the water the 'glue'(I think it is actually starch) that holds the threads together is released and you can then pull the threads out one at a time to leave the blackwork stitches on the background.

As these cq pieces are relatively small the threads are straight forward to remove but you do need to do them one at a time so it does take a while.

Tomorrow i see if i can do it with white thread!

Linda asked how this process compared to / used cross stitch. Other than the fact that I took the design from a cross stitch source, and that I first heard of waste canvas in relation to cross stitch it doesn't at all.

All in all, an effective method of adding motifs to cq that is straight forward and does not require any special skill. :)

Reading the Blackwork posts

Please remember to scroll down the series of posts on blackwork starting with the post called 'How to add blackwork to your CQ' and read them moving up the blog to the next entry. :)

Monday, January 30, 2006

Finished sewing ... not qite over yet :)


DSC01232(1)
Originally uploaded by Jam_mam.

I chose this design as i wanted a dense coverage of the hand to make the heart in the centre stand out clearly. i have also found that if you use to open a stitch on small areas (e.g. fingers) it is quite difficult to see the pattern and know where to sew.

On the larger crinoline lady which i stitched for the AlL that jazz block i used several different patternd to fill the shape, but as this hand is quite small i kept it to one.

The pattern was taken from this book. All the blackwork patterns are stitched in simple backstitch through all layers of the fabric using the grid provided by the waste canvas as a guide. nothing difficult, just time consuming, it took me an evening to fill in this hand.

The next step is to remove the waste canvas.

Beginning to sew


DSC01231(1)
Originally uploaded by Jam_mam.

Using backstitch and one strand of Anchor stranded thread (black) I stitched around the design over the lines marked on the canvas.

Waste canvas is really easy to use. Don't be put off if you haven't used it before. The stitches are worked through the holes in the canvas using it as a guide for fabrics which are not evenweave. Usually used for cross stitch the technique can also be used to apply other embroideries to materials it would otherwise be difficult to produce even stitches on. linda at Chloe's place uses it to sew the crosses which are the framework for her chicken scratch.

Another advantage of using waste canvas is that once tacked onto the fabric underneath it provids enough suport to the fabric that no hoop is needed making it easy to hold the pece in your hand as you sew.

In this phot I have also started to fill in the little finger shape with a blackwork pattern.

How to add blackwork to your CQ


DSC01228(1)
Originally uploaded by Jam_mam.

First outline the design onto the waste canvas, I used an ordinary ball point pen, and 14 hpi canvas.

This hand is taken from a book of Donna Kooler cross stitch designs.

Once you have drawn the outline onto the waste canvas, tack the canvas over the area on your cq block where you want to stitch the blackwork.

Sunday, January 29, 2006

Unbeknownst to the maiden

Unbeknownst to the maiden and her mother the wise women met to exchange spells over the wrapping. They chose a special venue for their meeting, a place where they were among their own kind and unlikely to be disturbed by negative energy of the uninitiated. Amidst the treasures and glories of the embellishing world they brought forth their wraps to admire the work already thereon and to consider their next additions.

Many strangers, women of craft but not those entrusted with this special mission, were drawn by the light of the wonderful work already a part of the wrapping's glory. They crowded around our wise women and asked in hushed, awed tones to be told the story of the wraps journey and it's purpose. Oh how they admired the handiwork of the chosen stitchers, and how they praised the idea of passing such knowledge to the next generation in the person of the maiden. Adding their own good wises and creative energies to the project they blessed the wraps with even more beauty.

Our own wise women discussed the next steps and, drawing on the inspiration of their surroundings, left the meeting renewed in their determination to cast yet more wondrous weavings onto the wrap. Slowly and irreversibly the wrapping was being transformed as much by the attention and care it received as by the stitches themselves.

Far away on the other side of the world the mother came to hear of this meeting and of the plans the wise women had for the wrapping. She marveled that such a small beginning had grown into such a momentous undertaking, and her heart was glad.

It is in our intentions and in our dreaming as well as in our doing that we truly reveal our inner strengths and the lessons for future generations.

Blackwork Cat


Blackwork Cat
Originally uploaded by Jam_mam.

Yesturday i started this cat in blackwork, actually it's brown work ;) as i couldn't find any back thread. vbg. Today i finished it and of course found the black thread too :) The contrast is fine here with the help of the camera flash, but in 'real' life it's a little too close to the background fabric and doesn't 'sing' but I live and learn :)

i first used blackwork on the 'All that Jazz' block and wanted to try out some more since then. I have decided to make this block a sampler of blackwork and to experiment with different sized pieces and colours of thread, and to work on that contrast!

My next motif is a hand which i intend to do in black and then I want to try some white pieces. i expect this might create a few problems as the waste canvas I am using is white too and it may be difficult to see where I have sewn and where I still need to do.

I also plan to try different numbers of threads as I have only used single strands thus far, what difference to the appearance does using 2 or 3 strands make?

After that i need to experiment with different patterns, some which cover the area less or more densely.

Anyway, all of that is for another day. For today I am quite pleased with my little pussy, at least I know now where i want to go, and some of what i want to find out on the way.

Friday, January 27, 2006

seaglass2


seaglass2
Originally uploaded by Jam_mam.

After starting a thread on a craft forum to discover if there is sea glass (beach glass) in Australia I thought i'd post a photo of some of my collection. B can't find any near her house but has some from the other side of the planet where her DD lives.

Why do i like it? I have various other bits and pieces picked up on the beach in the 4 years we have lived here. I have shells of course and I have various crab skeletons, large and small, and a small mammal skull. But I do have a soft spot for, and deliberately seek out the sea glass. I now have so much of the white/clear glass that I have stopped collecting it and I'm concentrating on the coloured glass, mainly blues and greens as you can see.

I would really like some red!

I prefer the pieces that are well worn and rounded by the sea's motion and the rubbing of the sand. I have thought of buying one of those 'mill's'(?) that you polish gem stoned in and making my own, but that would be cheating.

I think the beauty comes with the location and the company. Beaches remind me of my childhood in the Carribean, of being young and free. When we have a good day on the beach I think of it as memories in the bank for my children. I think that when they look back on their childhoods if they remember days on the beach then they will think they had good times.

The one thing you don't get from a scan is the translucent (or should that be opaque) quality of the glass. You really need to hold it up to the light.

There is also something magical about being able to pick up broken glass without cutting your fingers.

I like the idea that the sea is softening the waste we throw away and making the ugly polution beautiful.

I like the idea that sand is transforming the glass which is made out of sand.

I like the idea that one day I may make something from it, and that I may not.

Thursday, January 26, 2006

Country walk Plessy Woods


Country walk Plessy Woods
Originally uploaded by Jam_mam.

These are the winter days i like, no wind to speak of , none at all once in the trees, and a moderately cold day, about 5 degrees, lovely and warm once you are walking.

Trying out the digi to see how it copes shooting into the sun, not bad. The colours don't really show up, there was so much green and the sky was blue (between he heavy grey cloud banks).

I am so fed up of grey and we have had too many grey days, often so dark that the lights stay on in the house all day.

This place was full of bird song too, just what the Dr. ordered.

Plessy Woods January '06


Plessy Woods January '06
Originally uploaded by Jam_mam.

Such a lovely wood and especially good this time of year as it is almost empty. little one especially pleased to see so much mud! "Wellies are for mud!" Squelch, squelch!

Plessy Woods Jan '06


Plessy Woods Jan '06
Originally uploaded by Jam_mam.

No sewing today :( but lots of walking. Yes, here's the sun! rather washed out and weak but just what i needed after a hard week :) It was very refreshing to see so much green (in between the mud). this was taken at about 3pm and you can see how low the sun is already. Little one managed to climb all those steps unaided - lots of grunting and "I do it!"

red hot socks

I will be taking part in this KAL red hot sizzling socks as soon as i get some red sck wool :) yipee another excuse to stash expand VBG Once I find out how to add a button for this (Doh!) that will appear on the blog too. Meanwhile, just think red socks - these ones are for me to KEEP!

Wednesday, January 25, 2006

The wrapping is embellished


pink1
Originally uploaded by Jam_mam.

Here is the wrapping as last seen before beginning the next leg of it's journey.

The intense heat of the Australian summer has not damaged it's emerging beauty and the wise women are taking steps to protect it as it travels those lands so distant from the maiden's own.

Lands where day is night and summer is winter. Lands where mythical beasts roam dusty plains and deserts. Creatures only dreamed of in this place, live side by side with our wise women of the challenge.

Each resting place for the warp becomes a hive of industry for the sewer as she begins to work her magic on it. Each patch becomes a memory of those labours for the cause.

The lady Roz has added a magic symbol 'm' which will forever tie the wrap to it's eventual recipient, the fair Mairead. Placed in a fragrant garden, surrounded by love and cystaline forms of emphemeral creatures, the symbols power will transcend earhtly constraints and last as long as the wrap itself lasts. Forever calling the maiden back to gaze on it's wonderous face.

Now the next embroiderer in our chain has the wrap in her hand and ponders her decisions. Choices which will live on with the wrap and with the young Mairead through life's wending ways and twisting journeys and hopefully work their mystery's to bring her back to these creative arts now and in the future.

For this is the mother's wish, that one day the maiden, perhaps not for many years to come, will come to know the joy, challenge and triumph known to these women who worked the wrap. The joy that is creativity, the challenge that is design, and the triumph that is in spreading beauty to others.

Saturday, January 21, 2006

Mairead's CQ adventure continues ...

Some time ago, in the cold and misty land to the north, a young maiden was tempted by the treasures in her mother's sewing basket.
 
Mother, wishing to initiate this maiden in the ways of her craft, gathered together a band of wise women who agreed to share their knowledge and skill. The young maiden was helped by her mother to construct a simple fabric wrapping in which to carry the wisdom, and together they sent this wrap off into the distance with many thankful wishes for the success of the wise women's mission.
 
Many moons passed and reports began to filter back to the cold and misty land to the north. Sightings of the wrap were spoken of in hushed wispers, as the people of the project began to marvel at the intricate wonders wrought in the maiden's honour. Beautiful patterns and tantilising textures were added to the wrap and it's beauty began to attract admiring glances from all lucky enough to see it. It travelled the globe to places warm and sunny and full of vibrant embroidery and embellishment.
 
At each stopping something of the knowledge and enthusiasm of the wise woman of that place was transferred to the wrap.
 
Do you want to peek at the wrap as it travels on it's journey? Pictures of the progress thus far can be seen at http://sharonhunting.blogspot.com/2006/01/ms-block.html and at http://cqcrazy.blogspot.com/2005_12_01_cqcrazy_archive.html
 
And now the journey continues ...

Finding Fabric in Furniture

Listening to BBC Radio 4 this morning I heard this wonderful story about finding old clothes in a piece of furniture during restoration http://www.bbc.co.uk/radio4/hometruths/20060123_chaise.shtml
 
This led me to http://www.concealedgarments.org/ where there is a resource of 'found garments' and their stories. I wonder if you've ever found anything in old houses or even hidden inside furniture :)


Thursday, January 19, 2006

snail's trail christmas variation


snail's trail christmas variation
Originally uploaded by Jam_mam.

As I am making blocks for the other members of the row by row quilt swap I have decided to make a block of each pattern I produce in my own fabrics to keep. last year I made 11 blocks for a friendship block swap. Some of them were really nice blocks (if I do say so myself) and I wish I had thought of doing duplicates then too. Anyway, this year I will make an extra block. So, Di's block was snail trail and I have made one in my christmas fabrics for me to keep. I haven't decided whether to use these in my finished row by row quilt or to keep them for something else.

As you can see this one came out very differently from Di's blcoks. The strong colours of Di's blokc and only using two fabrics for each one made the curve of the snail's trail very obvious. Here the different prints were confined to blus and red but with less definition to the finished design. I think the centre blue was probably a mistake as it is too light and doesn't allow the pattern to be seen very clearly. Instead I have ended up with a square within a square arrangement which I am quite happy with. I have one foundation pattern left and may attempt this again with darker blues in the centre, may.

So how do I read blogs

I usually find new blogs through links from ones I already visit. SharonB's blog inaminuteago is especially good for this. Recently I have stopped visiting some where there are less frequent posts as I still visit each one individually to check if there are any new items rather than using some kind of service to advise me of new postings - this was just taking too long. On a new blog I read the most recent posting first and then scroll down if it catches my interest following links as I go.I never look at profiles, i'm really interested in what people have written and not who they are. I might look at a profile after I have visited a blog many times but usually not at all. I do try to leave comments on new blogs if I can think of anything constructive to say as I remember how I felt about receiving those first few comments on mine, delighted. It is stilla htrill to know people are reading what I write and I have the thing set up so that it emails me any comments that are left.

CQ Book


CQ Book
Originally uploaded by Jam_mam.

I needed even more retail therapy - at this rate I could afford the real thing! Therapy that is! Anyway Border's were having a student discount day with 20% off - sadly they didn't have anything I really HAD to have but as I HaAD to have something (well, it was a bargin) I got this. It's really very similat to her other books (published in 1995 I'm not sure if it might even superceed them) but there are some photos I haven't seen before in it and some pages at the back where she shows her journalling process for a few projects complete with drawings and notes. As I am just beginning to journal things I found this interesting, the ISBN in case anyone is interested is 0-914881-85-X. It's the inspiration rather than the stitch diagrams that I'm after although the stitch combination pictures are always useful.

Talking of ISBNs, Sharon asked for the one for White on white from yesturday's blog entry - here it is - 1-904485-18-9, published by Coats Crafts UK in 2004.

Wednesday, January 18, 2006

Quilting with a difference


Quilting with a difference
Originally uploaded by Jam_mam.

One thing that puts me off embroidering quilts is the time invloved especially when you also hand quilt - as I usually do. So here's the answer, combine the two, enbroider as you quilt.

Quilting with a difference


Quilting with a difference
Originally uploaded by Jam_mam.

One of the things I like about this book is the lovely clear step by step diagrams, I haven't used the book yet but I'm thinking of looking for inspiration for the making up of the friendship block swap from 2005 and the row by row quilt I'm doing now.

Knitting book - again


Knitting book
Originally uploaded by Jam_mam.

Uninspiring front cover - but this book covers so much more than what I think of as finishing. If you get a chance to browse this book do take it - I think it is a perfect way to begin the move from knitting other people's designs to designing your own items.

Finishing Techniques for knitters


Finishing Techniques for knitters
Originally uploaded by Jam_mam.

Internal view chosen at random to show how much information is contained in this book. Hopefully this will illustrate what I mean about moving on to designing your own garments.

White on white


White on white
Originally uploaded by Jam_mam.

Managed to get a copy of this book by Janet Haigh, which I have been looking for for a while. Love the white on white stuff and will get back to finishing the christmas ornaments sometime (probably as next christmas approaches.

White on white internal


White on white internal
Originally uploaded by Jam_mam.

Page shows just one of the beautiful projects in the book and on the facing page the diagrams of different stitches, and yes, I do know I don't need any more stitch directories :)

Di's row by row 2


Di's row by row
Originally uploaded by Jam_mam.

Hi all, here is Di's row 2. I haven't trimmed around the outside yet but the majority of the work is done. Some of those blocks are not exactly 8" Di so you may need to add sashing between the rows or you may be a sewing magician and be able to make the seams line up :) Either way I am quite pleased with how this turned out, not bad for a first attempt t foundation piecing. Jane, I'm off to think red and white thoughts as it's your block next. Lyn, still haven't had a minute to go and buy myself a journal *sigh* hoping to make some time tomorrow or friday.

Tuesday, January 17, 2006

How do you read a blog?

Whilst I was doing my morning round up of new posts on favourite blogs I found this question on Zeneedle http://zeneedle.typepad.com/zeneedle_process_of_art/
scroll down to the entry for 13th Jan - so go on how do you read a blog? My answer? tomorrow :)
I am havibg trouble posting to my blog at the moment - I have upgraded my browser to Netscape 8 - ever wish you'd never bothered :) Hopefuly normal service will be resumed as soon as possible ;)

Sunday, January 08, 2006

Mum's Socks finished


Cnv0311
Originally uploaded by Jam_mam.

Here's the pair, finished and in the post tomorrow - should be there in time for her birthday and if they're too big she can swap with 
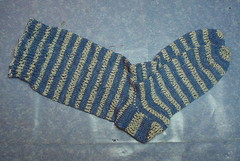
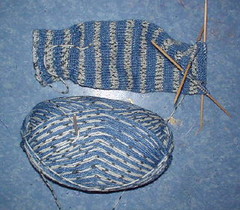
dad's socks from his birthday which were too tight. They are bed socks anyway so the fit isn't crucial :) If she doesn't like them I'll have them back - my second ever pair. Next pair are definately for me!
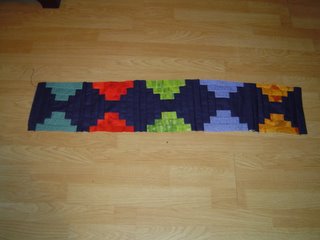
So, knitting projects reduced by one. OTN I still have my Colinette cardi and a jumper for Katie, a Debbie Bliss pattern in gorgeous soft wool, one sleeve to do, but knitting up a bit big for little X so no rush.

I feel some sewing coming on. After last nights - rubbish row I think i had better get some practice in for the row by row swap *sigh* I moved my design wall into the front room with all the rest of my stuff. I changed rooms last year as the house began to fill up with brightly coloured plastic and X and I needed more space but never got round to moving the fabric for my design wall through to the front room. Now it is back up and row one is on it. Yesturday's photo is a little washed out by the flash the colours in the log cabin are strong bright reds and blues and I really like them so i am hopeing good things will follow and this will be a bright cheerful quilt. The only way it will be complete for Christmas 2006 is if the rows are here early *rolls eyes* and as I am a bad one for rushing to meet deadlines at the last minute I can't expect anyone else to be early, so i am thinking 2007, which gives me lots of time to do the quilting. I am playing in my head with different settings rather than straight row on row and different borders and sashing to see what shapes and dimensions I can come up with. Might not use any of these but having fun thinking about the possibilities. Looking forward to my next row which is for Di and is bright amish type colours with a feature fabric Di has sent in navy. This row is 'open' so I am waiting for Di's notebook/log to see if she has any preferences.

This is Di's first row
and this is the row Ted is doing for her and

jam_mam's row 1


jam_mam's row 1
Originally uploaded by Jam_mam.

Decided it was time I got on with the sewing - that's why I'm up blogging the row by row first row - log cabin at 12.45 (yawn) just finished. And it is shocking! Good job you can't see too close up :( Also good job I am not a perfectionist! And a good job this row is for my quilt :) If it were someone else's row I would have to do it again, it's miles out and too short but it is 40 1/2" wide because I just kept adding strips until it was and then trimmed it down to 8 1/2" wide. Maybe I should try foundation pieceing, maybe I should not sew when I ought to be in bed, maybe I should sew straight lines straight! Oh dear, ah well, onward and upward:)

The theme for my quilt is Christmas, inspired by the great quilt Jenkay made from the friendship block swap for 2005 :) The prints are all predominantly red or blue because that's was the christmas prints I had in my stash in abundance. I am happy for people to include green, gold, or any fabrics they consider to be christmassy - most of the prints have stars on them somewhere so I am also happy to receive stars for this quilt.

Thursday, January 05, 2006

More books - knitting this time.

Needed some retail therapy today (it's a long story) so I went to the book shop and got this This wonderful book has designs for 900 jumpers, cardigans and most importantly (for my new years resolution) has instructions for knitting in the round. I will learn how to do this competantly this year so I can get away from my hatered of, and aversion to, sewing up knitting! Theoretically, I need never by a knitting book again, once I have the companion volume . Yeh, right! You believe me don't you. ROFLM.

Other than this shopping I have also been knititng :) A couple more inches on Mum's second sock so hopefully I get to turn the heel tomorrow and then finish by the day after. Need to get these posted by the 9th or 10th at the very latest (with expensive next day postage if it's the 10th - vbg)

I have plugged this forum a few other places but don't think I have mentioned it here before but I have learned more about knitting in the month I've been a member than in the preceeding 35KY (knitting years).

In case anyone is wondering I haven't stopped sewing :) I've just stopped sewing for the time being whilst I finish the present for Mum then back to the machine with the row by row and art quilt challenges :) This is supposed to be the year I get to grips with some of those UFO's!

Monday, January 02, 2006

More Socks


More Socks
Originally uploaded by Jam_mam.

Opal self patterning yarn - for mum's birthday. Originally bought this to make myself a pair - have a bad habit of giving everything away :) but the compullsion got the better fo me so these will be for mum. Mine next!

There is the entry about the first pair of socks I made for my dad.

Stash builder - squishie


Stash builder - squishie
Originally uploaded by Jam_mam.

I went to collect some mail from the sorting office and this lovely surprise was waiting for me. There were also some metallic threads which have been absorbed by my stash! Thank you so very much Jan, what a lovely surprise and a great way to start 2006 :)

M's Bag2


M's Bag2
Originally uploaded by Jam_mam.

and the other side of the front of the little denim skirt she is working on. So far she's broken 4 needles but it's a small price to pay for seeing her sew when every other encouragement I've given her to start sewing has failed. Looks like the cq did the trick :) She was also very keen for me to photograph and blog her work so you could all see it too. Blogging goes intergenerational :)

MAureen and Lyn have both posted photographs of the work they've done on M's blocks which are here.

M's Bag1


M's Bag1
Originally uploaded by Jam_mam.

My DD has been inspired by looking at the work people have been doing on her naked blocks hereand here to begin a 'bags of fun' bag of her own. Here are some buttons and beads she filtched from my stash.

Ideas for art quilt challenge


Ideas for art quilt challenge
Originally uploaded by Jam_mam.

My wool picture is beginning to give me ideas - here are the preliminary sketches from my journal. The interpretation is still quite literal at this stage but I expect it to evolve as I begin to look for materials and methods. The piece will be quite large 42" x 52" to hang in the space above my fireplace. It will also be very textured with lots of additional materials, wool (no surprises there :)) and padded shapes too. I also thought about including other animal references apart from the sheep and rabbits that are already there in the drawing but I don't know how to draw alpaca. I would use phot transfer pictures but that would change the cartoon character that I have come to like about my work so maybe I will find another way, any suggestions welcome :) The flowers below the shelf were suggested by the out of focus shapes in the photo and came from the colours. The bees are because the balls of wool reminded me of beehives! I am also thinking of knitting stitch samples and attaching them to provide texture and contours for the hanks of wool. Look at the original picture to see colour suggestions. Love the picture that was sent to me as my inspiration for this project more and more every time I look at it :)

The blog for this challenge is here and is well worth a read as there is lots of discussion about design and different techniques for realising those designs.